To set up quizzes on eClass, you'll need to create a quiz activity and add questions to it. During the setup, you can adjust various quiz settings, including the number of attempts, start and end dates, and time limits. We recommend reviewing our best practices for quiz setup to ensure an effective and smooth experience.
Adding a Quiz to Your eClass Course
Follow the steps to add the quiz activity on your course home page:
- Click Edit mode toggle to turn it on at the top right of the course home page

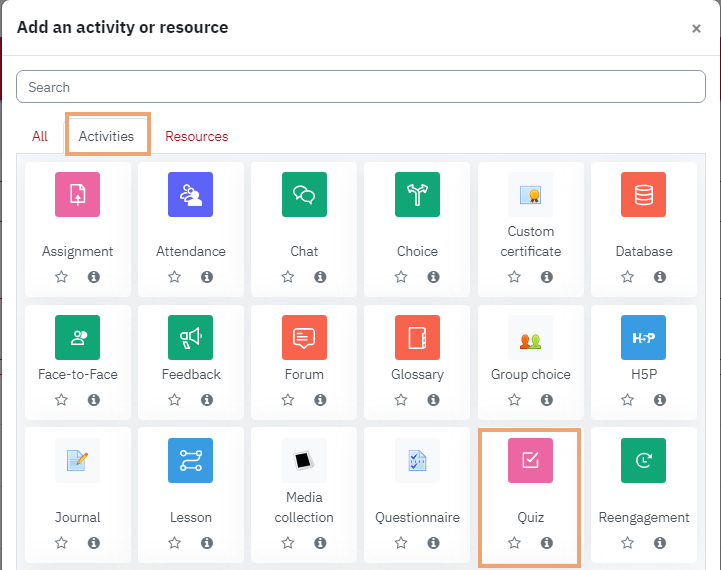
- Click Add an activity or resource in the course section where you want the Quiz to be added.

- Select Quiz in the pop-up (also listed under Activities tab), and then click Add. The Adding a new Quiz page will appear.
Configuring a Quiz
Click Expand all to expand each of the sections and reveal the options.
General
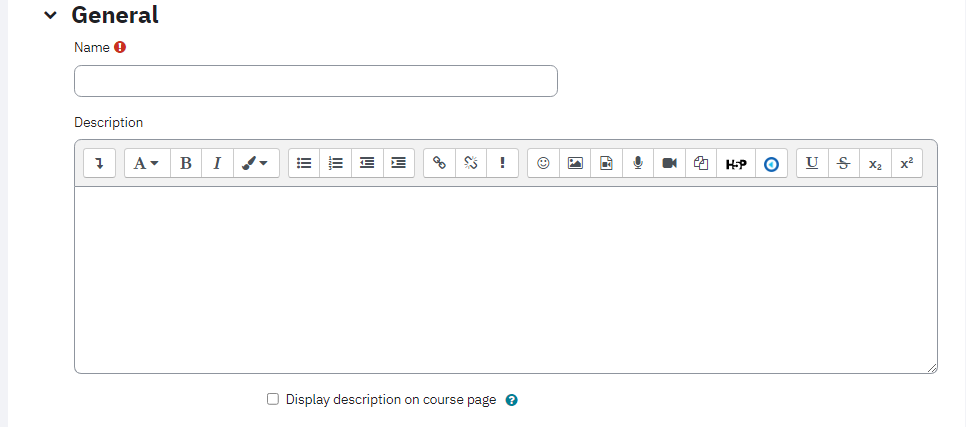
- Enter the quiz title in the Name field. This title will appear on course home page, which participants will click to access to quiz.
-
Add important details and policies about completing the quiz. Enter an optional description in the Description text box. This information will be displayed above the start attempt button.
- Click the Display description on course page check box if you would like to display the description on course home page.
Timing
The quiz does not have a time limit by default. Adjusting this will give your students as much, or as little time as they need to complete the quiz.
- Place a check mark in the Enable check box if you would like to open the quiz at a specific date and time and select a date and time from the Open the quiz drop-down list.
- Place a check mark in the Enable check box if you would like to prevent students from attempting the quiz after a certain date. Select a date and time from the Close the quiz drop-down list.
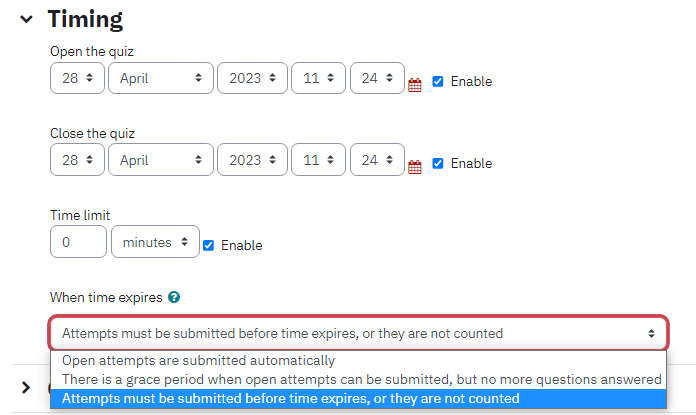
- Place a checkmark in the Enable checkbox if you would like the quiz to have a time limit and enter the time allowed to complete the quiz in the Time limit box.
- Select the behaviour in the case of an un-submitted quiz by a student who is logged out from the When time expires drop-down.
- Open attempts are submitted automatically will submit students' attempts if they have not submitted a quiz when the time expires.
-
There is a grace period when attempts can be submitted, but no more questions answered will allow students a grace time specified by you to submit the quiz. However, they will not be able to answer any additional questions during that period.
- Enter a Submission grace period and check the Enable check box if you would like to a provide grace period for submissions. Students must submit their quiz before the end of the grace period, otherwise their quiz attempt will not be submitted.
- Attempts must be submitted before time expires, or they are not counted will ignore any un-submitted attempts.
Grade
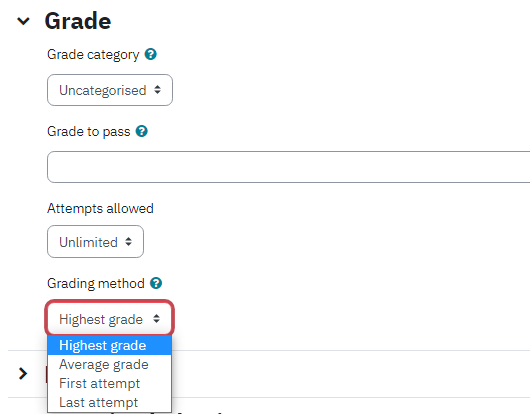
- The Grade category option is relevant only if you have created categories within course gradebook. Select the category from the Grade category drop down in which this quiz should be added.
-
Grade to pass can be used in activity completion or course completion or to highlight rows in the gradebook based on pass (green) or fail (red).
- Select the number of times a student can attempt the quiz from Attempts allowed drop-down list.
- Select how the final grade for the quiz is calculated from the Grading method drop-down list when multiple attempts are allowed for the quiz. (The Grading method option will not impact the final grade for quizzes that are allowed only one attempt.)
Layout
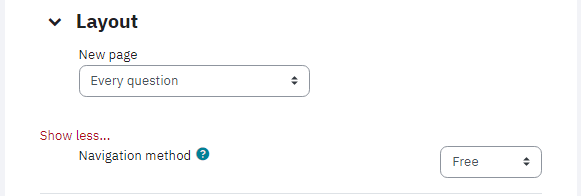
- Select the number of questions that appear per page from the New page drop-down list.
- Select Free or Sequential from the Navigation method. If you would like students to progress through the quiz in order select Sequential. Students will not be able to go back to previous questions when using sequential navigation. You may need to click Show more... to display this option.
Question Behaviour
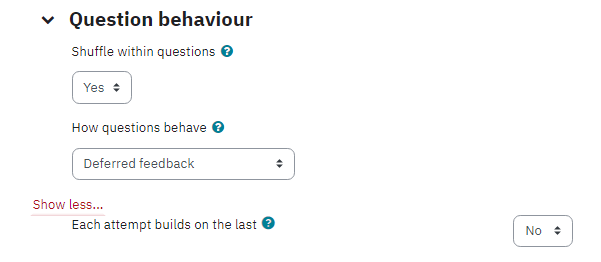
- Select Yes from Shuffle within questions drop-down list if you would like to shuffle the parts making up a question in each attempt. (If you have answer choices such as all of the above, uncheck shuffle within question at question level while setting up the question).
- Select how questions interact with students from How questions behave drop-down list.
- Deferred feedback requires each question to be answered and the entire quiz submitted before any feedback is provided.
- Adaptive mode and Adaptive mode (no penalties) allow students to attempt a question multiple times before moving on to the next.
- Interactive with multiple tries provide feedback after submitting one answer. Students can then read the feedback and try the questions again.
- Immediate feedback provides feedback after submitting one answer. However, students cannot attempt the question again.
-
Deferred feedback with CBM or Immediate feedback with CBM (certainty-based marking) requires the student to indicate exactly how certain they are of their answer. The grading is adjusted based on the level of certainty.
- This option is applicable only if multiple attempts are allowed for the quiz. Select Show more, then select Yes from Each attempt builds on the last drop-down if you would like students to be able to view results of previous attempts in subsequent attempts.
Review Options
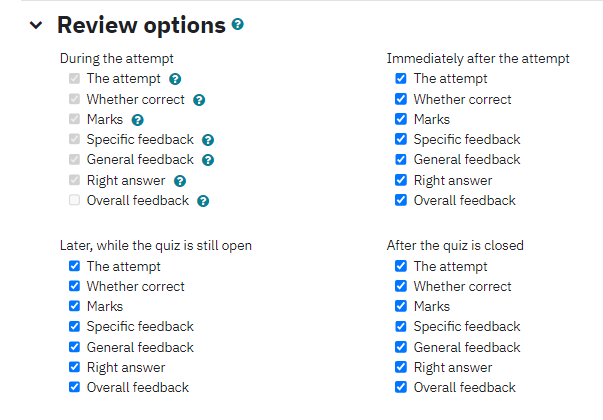
- Select when you would like feedback and marks to display during the quiz.
- During the attempt displays feedback during the quiz, where relevant.
- Immediately after the attempt displays feedback immediately after the quiz is submitted.
- Later while the quiz is still open displays feedback after two minutes of submitting a quiz and before the quiz close date.
-
After the quiz is closed displays results only after the quiz close date.
- The options include.
- The attempt displays whether the students can review their attempt at all.
- Whether correct displays Correct, Partially Correct, or Incorrect results to students.
- Marks displays the numerical marks for each question and overall attempt score.
- Specific feedback displays based on what the student response to the particular question.
- General feedback displays to all students no matter their response.
- Right answer displays an automatic summary of the correct response.
- Overall feedback displays at the end of the attempt depending on the student mark.
Appearance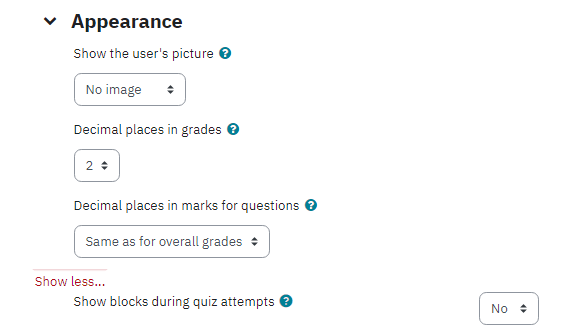
- Select Yes from Show the user’s picture drop-down list if you would like to display user's picture during the quiz attempt.
- Select Yes from Show blocks during quiz attempts if you would like to display blocks during the quiz attempt.
Extra Restrictions on Attempts
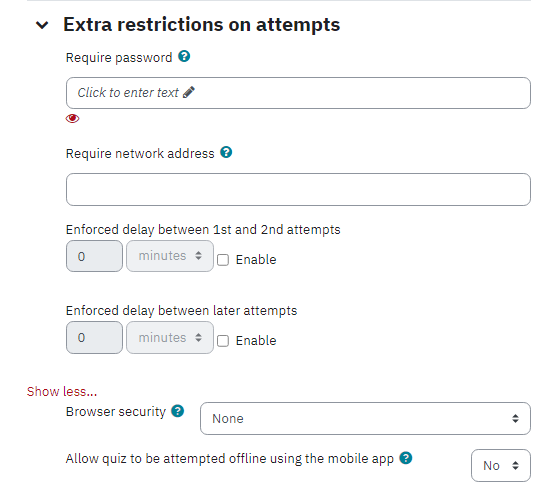
- This helps you to prevent students from attempting an in-class quiz before you have provided all the instructions and the password. Enter a password in Require password field if you would like to make the quiz password protected. The student will have to enter the password provided by you to start attempting the quiz.
- This helps you to ensure that only students present in the class at the moment can take the quiz. Enter a comma-separated list of partial or full IP address in the Require network address field if you would like to restrict access by IP.
- Enter the wait time a student must wait before starting a second attempt in the Enforced delay between 1st and 2nd attempts box and place a checkmark in the Enable checkbox.
- Enter the wait time a student must wait before starting subsequent attempts in the Enforce delay between later attempts box, and place a checkmark in the Enable checkbox.
- Browser Security: Fullscreen popup with some javascript security will open the quiz in fullscreen popup window with no course navigation controls. This setting requires that a student has a javascript-enabled web browser. However, this doesn't prevent students from minimizing the window or moving it aside.
Overall Feedback
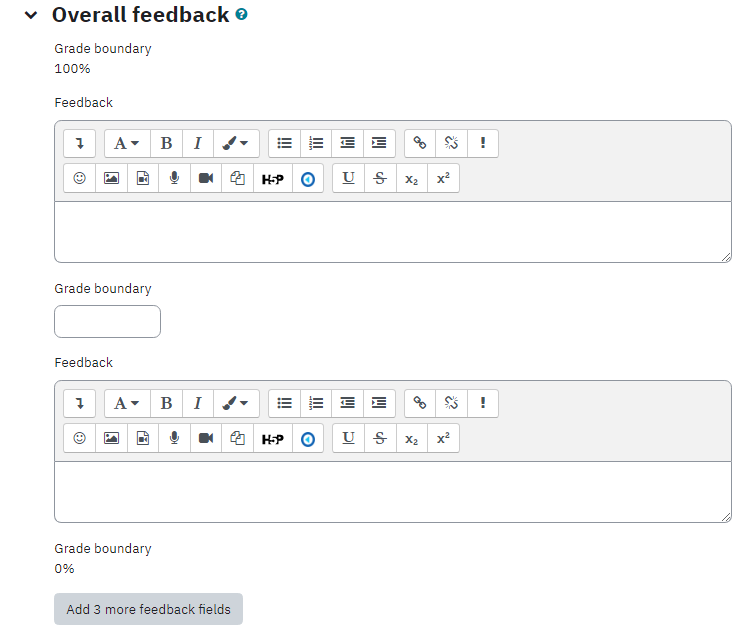
This allows you to provide a different overall feedback based on the grade students received in the quiz. Enter the grade for which feedback appears in the Grade boundary fields with corresponding messages in the Feedback text boxes.
Common Module Settings
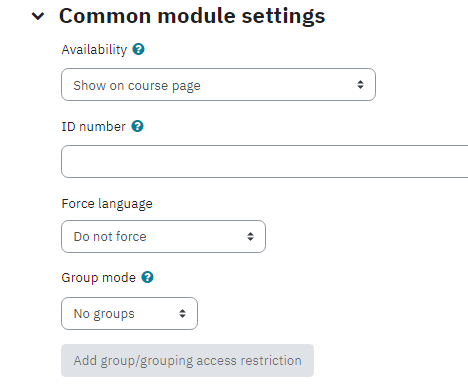
Select Hide from the Visible drop-down list if you want to hide this activity from students. This option allows instructors to control when a resource is available to students.
Restrict Access
Restrict access options allow you to set restrictions on an activity or resource by date & time, or by conditions related to previous activities. Refer to the official restricting access article, or our own implementation of it in eClass specifically.
Activity Completion
When enabled, completion tracking allows resources and activities to be marked as "completed" manually or when certain conditions have been met to help students manage their workloads. Refer to the official Using Activity Completion Tracking or our in-house instructions.
Click Save and display to view the quiz.

Adding User override and Group override
User override
Allows changing quiz settings for a particular user or users
- Click the More icon and select Overrides from the drop-down menu, as shown below:

- Choose User overrides from the drop down menu, then click the Add user override button, as shown below:
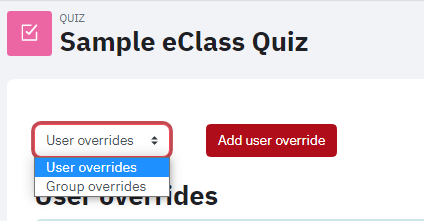
- Select the user and setup the override settings including quiz opening date, closing date, time limit and number of attempts allowed, as shown below:
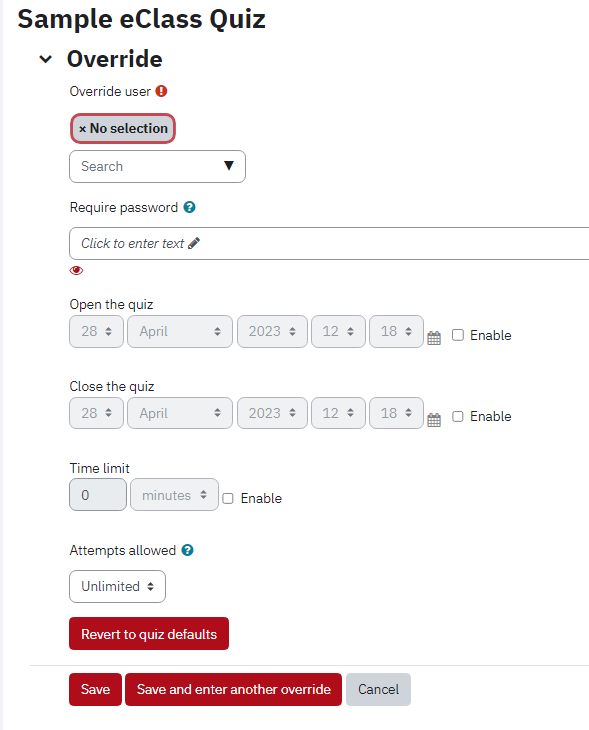
- Click Save when you are done.
Group override
Allows changing quiz settings for a particular group
- Click the More icon and select Overrides from the drop-down menu, as shown below:

- Choose Group overrides from the drop down menu, then click the Add group override button, as shown below:
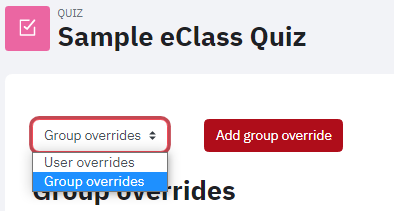
- Select the group and setup the override settings including quiz opening date, closing date, time limit and number of attempts allowed, as shown below:
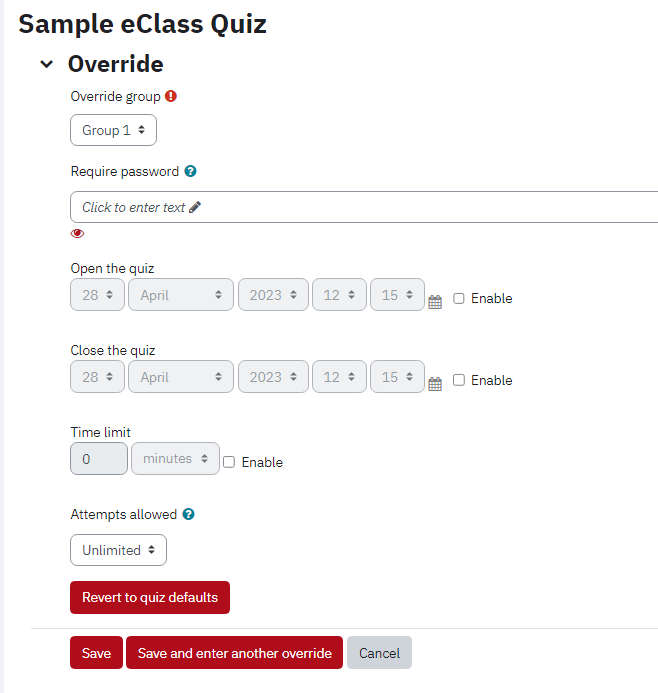
- Click Save when you are done.
Once you've created your quiz, it's time to start adding questions to your quiz.